Resolving Disconnected SQL Server Mirrors

On more than one occasion I’ve had a SQL Server mirror disconnect and reconnect repeatedly over a short amount of time, due to an unstable connection between the Principal and Mirror databases.  Usually, this resolves quite quickly and the Mirror will begin re-synchronizing on its own.

Occasionally, however, the mirror would get into a state where it believed it was disconnected, even though the connection between the two instances was up and stable.  When this occurs, you can usually resolve the issue by simply restarting the mirroring endpoints.

First, find the name of the endpoint, if you do not already know it, but issuing this command from the Principal side:

SELECT [name] FROM [sys].[database_mirroring_endpoints]

Then, using the name returned from that simple query, issue the following two commands back-to-back (replacing the endpoint name with your own):

ALTER ENDPOINT YourEndPointName STATE=STOPPED
ALTER ENDPOINT YourEndPointName STATE=STARTED

In each of my cases, this has immediately resolved this issue and caused SQL Server to resume synchronizing the mirror.  I hope this helps.

Sneaker-Net Saves a 20 TB SQL Mirror

It started a little more than an hour after the ball dropped on New Year’s Day 2016.  We had had a few friends over to celebrate and we were just saying goodbye to the last of our company when I started getting hit with a wave of texts right at 1:35AM.  I glanced down at my watch:

SEV 20 – The client was unable to reuse a session…

I had seen the error before.  It always indicated some momentary saturation of the network.  I would usually get a cluster of them, then the moment would pass and everything would be fine again.  The condition would only last long enough for the client to have to retry the connection, due to connection pooling failing to maintain the session.  The users wouldn’t even see a blip.  It was one of those errors that I knew I should get around to solving, and it was on my backlog, but let’s be honest: with everything else I have to do every day, and the fact that there was zero user impact, this one had slipped pretty far down the list.

Normally, I would get a cluster of these errors, and everything would subside.  This time, however, they just kept coming; hundreds of them; my phone chirping and buzzing with each new arrival.  Then my custom SQL Mirroring job spat out a hundred or so e-mails telling me that all of my critical database mirrors had just disconnected!  Uh-oh!  This wasn’t just some blip…

I quickly explained to everyone that something was going on and rushed upstairs to log in and see what was causing this.  Everything seemed fine on the Primary site’s servers, no SAN failure: good; no memory pressure: good; no crazy CPU: good.  I checked a few databases mirroring statuses: DISCONNECTED, DISCONNECTED, DISCONNECTED.  I RDPed to the DR servers and was able to connect in, but as I started to inspect more, *blip*, my RDP session dropped.  I reconnected, started looking around again and, *blip*, disconnected again.

So, it starts to dawn on me that something is going on between the two sites.  I disconnect my VPN session from the Primary site and reconnect to our DR VPN.  Now my RDP session to the DR servers is nice and stable.  I try to connect to a Primary server, just to test my hypothesis: after a few seconds, *blip*, disconnected.  This is when I jump on the phone and call our infrastructure team.  I tell one of the guys that I think something is going on with our microwave connection between the sites and he starts digging in to see what might be the cause.

Our Beloved Microwave

For a little bit of background, we’ve had our DR site for about 15 years.  Around ten years ago, we started to outgrow the 3 Mbps connection we had between our primary and DR sites.  We decided to go for a microwave connection because we could operate it in unlicensed frequencies for no annual cost and get about 100 Mbps Full-Duplex for just the initial equipment purchase, installation, and then annual service warranty.  While our use of this connection has grown dramatically over the past ten years, we have rarely bumped up against that upper limit for more than short bursts.  This has been a great solution for us.

Tonight, however, it seemed it was starting to show its age.  We had fought to get a replacement pair put into the budget each year for the past several years.  We knew it was getting to be past the “best by” date and our projections were showing that before long the 100 Mbps wasn’t going to cut it any longer.  Upper management, however, had been reluctant to replace it proactively.  No new story there.

About an hour later, the microwave started to calm down and become more stable once again.  We were still seeing enormous latency, but we were at least maintaining connectivity.  My mirrors were getting back in sync and it looked like we might be ok through the weekend, at least.  We had already put in a call to our warranty vender, but since the connectivity had been partially restored, they didn’t want to send anyone out and our infrastructure team didn’t really want to make it too much of an issue either.  We would handle it on Monday.

Down for the Count

Well, it didn’t last that long.  Just 36 hours later my phone starts blowing up again with alerts.  I contact infrastructure again and they start scrambling to see what’s going on: they confirm, it’s the microwave.  This time it seems it has gone down for good.  I go ahead and disable my alerts so I can stop getting buzzed every few seconds and I start talking to the rest of my team about how we’re going to handle what appears to be an extended outage.

We quickly assess our status: the microwave connection is down, our database servers are still being actively hit by production users and working just fine, but our transaction logs are growing and our data at the DR site is getting more stale by the minute.  Also, it’s the weekend, so we are running some of our most aggressive index maintenance.  We decide to stop the index maintenance for now and see how long it will be before infrastructure is going to have the link back up.

Then comes the bad news: our warranty vender is not able to fix the problem and we need new hardware, BUT, they are having trouble sourcing a replacement.  Now we see that this is going to be more than a 4-hour or even 24-hour turn-around.  We realize that we are going to have to do something, or our DR site is going to become so stale that it will be essentially useless.

Maintain…

So, first, I mention to infrastructure that we have redundant internet connections at both sites.  There’s a whole 10 Mbps Internet connection at the DR site and a 30 Mbps Internet connection at the Primary that aren’t usually being used, they’re just for backup if the primary connections fail.  I suggest that we take a couple of routers and setup a VPN between the two sites over the Internet so that we will at least have SOME connection between the two sites.  They set it up and route just the database VLAN over the new VPN tunnel.  Now we have connectivity for our databases and they start to slowly attempt to get back in sync.

This is fine for our smaller, less-active databases.  But we have several very large databases and one in particular is first on my mind.  It is a 20 TB critical database and it’s creating transaction log records at a rate of about 12,000 KB / sec.  There is no way our 10 Mbps connection is going to be able to catch up.  The DR site is already 8 hours stale by this point and the roughly 240 GB of transaction logs that are unsent are stating they’re going to take over two days to sync up, if we were to stop transacting right now, which, of course, is not going to happen.  We do ask a few of our heaviest users if we can delay some processes, but this only helps a bit, and they cannot hold off their processes for very long, and we’re not really sure how long it will be before our 100 Mbps link is back up.

Sneaker-Net Rides Again

With Monday coming up quick and business getting ready to swing into “full-on” mode, we have to have a solution.  I grab a 2TB USB hard drive and plug it into one of the nodes of our cluster.  I know that if I can get all of the transaction logs from the point of our last sent transaction up until our most recent transaction log backup, I can apply them at the DR site and keep this party going.  Sneaker-Net has taken many forms over my career:  it used to be floppy disks, when there either WAS NO network, or the 10Base2 connections had become unplugged for some reason; it then evolved into Zip Disks, packing a 100 MB punch of data at a time; and eventually burnable CDs helped get me through tough times; now, it was 2 TB I could fit in my pocket.  I almost got nostalgic as I grabbed the DR site keys and jumped in my car.  The robocopy command hadn’t taken very long and I was on my way with a fist full of data and a plan.

Now, I must admit, breaking the mirror on my 20 TB database gave me pause.  Sure, it SHOULD all work as planned, but what if I messed something up?  I didn’t have time to consider if for long: I broke the mirror and started apply transaction log backups en masse.  When the script finally finished, I re-established the mirror and after just a few moments, we were “Synchronizing” again.  The mirror was still stale by about an hour and a half, but that was, of course, due to the time it took to copy the transaction log backups from the Primary site to the external hard drive, drive them over to the DR site, copy the backups to the DR site server, and apply the transaction log backups there.  It wasn’t going to be in sync, that just wasn’t possible.  But it is way easier to tell the president of the company that we are a couple hours stale, rather than the alternative.

A Very Long Week

Our Infrastructure team ran into roadblock after roadblock getting the microwave replaced.  I won’t go into the details at this time, but suffice it to say that you REALLY need to make sure your warranty vendor can provide the level of service they have signed to; especially on specialty equipment.  Arbitration and compensation after the fact is NOT going to save your data during the fire.  My team and I took turns running data between the Primary and DR sites a couple times a day for the next several days while we waited for a resolution.  We all breathed a sigh of relief when at 10:25 PM on Tuesday, January 12th, I sent out the e-mail to our Business Continuity group that, “All Production databases are fully synchronized with the DR site.”.  Short and simple, but that one sentence represented one crazy outage for us.

Steps Taken, For Reference

I’m going to enumerate the steps here, just in case anyone needs the specifics:

  1. Temporarily pause your transaction log backups at the Primary site so that new transaction log backups are not taken while you are couriering your data from one site to the other.
  2. Copy all transaction logs from your Primary site to your media of choice, I prefer using robocopy for speed and simplicity. In command prompt issue something similar to: robocopy C:\TransactionLogBackups\ D:\SneakerNet\
  3. Physically transport the backups to the DR site and copy them to the DR server.
  4. Break the mirror from the DR site, by issuing ALTER DATABASE dbname SET PARTNER OFF; (in some cases, I had to issue this command twice, otherwise the first transaction log backup restoration would complain that the database was busy)
  5. Start applying the transaction log backups WITH NORECOVERY, by issuing RESTORE LOG dbname FROM ‘D:\LocationOnDisk\backup051.bak’ WITH NORECOVERY;
  6. After all transaction logs have been restored WITH NORECOVERY, re-connect the mirror from the Primary site.
  7. Don’t forget to Re-Enable your transaction log backups at the Primary site.

I hope you’ve enjoyed reading about this adventure I had.  It is way easier to look back on it now that it is over than when we were right in the thick of it.  If you’ve never had to do any sort of emergency recovery, I would recommend you practice doing so.  Bring up a test instance and then break it and try to fix it.  Going through the stress of figuring out how to work through the situation when there isn’t company data on the line is way better than figuring it out once you’re already in the situation.

Deployment and Usage of a CLR Stored Procedure

Once we have setup our environment properly, written the code we are wanting to deploy, and decided how we are going to handle code security for SQL CLR, the remaining steps are very straightforward.  Unless we are referencing other libraries that are not part of .NET, but that will be discussed in detail later.

Problem with the master database

Before we deploy, there is one error that you may run into on Visual Studio 2010, if you attempt to deploy your code directly to the “master” database.  If when you deploy to master, you receive the following error in the “Build” Output:

Deploy error SQL01268: .Net SqlClient Data Provider: Msg 15657, Level 16, State 1, Procedure sp_db_vardecimal_storage_format, Line 65 Vardecimal storage format is not available in system database 'master'.

This is due to the deploy script attempting to enable the vardecimal storage format on master, but you cannot perform this action in master. So, to work around this problem, you will either have to deploy to a different database, or you can implement a new “Database Project” that references your SQL Server CLR Object.  This process is described in detail on MSDN, so I will not repeat it.

Deploy Your Code

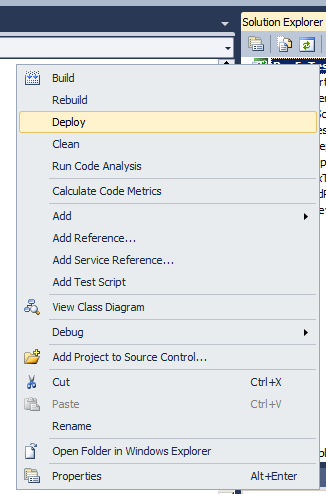
If you have .NET setup properly, all you have to do to deploy your code is right-click on the project in Solution Explorer and click “Deploy”.  If you haven’t already built your code, it will build (compile) it before deploying the code to SQL Server:

Deploy Project


You should be able to see the results of your deployment in the “Output” pane within Visual Studio. Toward the end of this output, hopefully you will see something like:

Build succeeded.

Time Elapsed 00:00:06.84
========== Build: 1 succeeded or up-to-date, 0 failed, 0 skipped ==========
========== Deploy: 1 succeeded, 0 failed, 0 skipped ==========

Testing Your Code

At this point, your SQL CLR stored procedure should be deployed and ready to use on your SQL Server database.  Connect to SQL Server through SSMS and connect to the database to which you deployed your code.

I have created a very simple Test that you can use to test your code:

DECLARE @isMatched	BIT,
		@pattern	VARCHAR(256) = '([A-Za-z0-9\-]+)',
		@testString	VARCHAR(256) = 'some text string'
 
EXEC @isMatched = RegExTestMatch @pattern, @testString
 
SELECT @isMatched
 
SET @pattern = '([0-9\-]+)'
 
EXEC @isMatched = RegExTestMatch @pattern, @testString
 
SELECT @isMatched

Assuming that you get no errors, the first Execution should return a “1” because the test String matches the Regular Expression. The second Execution should return a “0” because the test String does not match the Regular Expression defined.

I will be adding some more complex objects soon, but in the meantime, I hope that this short tutorial gives you an insight into how SQL CLR can improve your environment.


This post is part of a series of blog posts entitled SQL CLR: An Introduction, the other posts are as follows:

  1. The Origination and Uses of SQL CLR
  2. Infrastructure Requirements and Configuration
  3. Writing a Simple CLR Stored Procedure
  4. Security and Signing
  5. Deployment and Usage
  6. Table-Valued Functions and Other SQL CLR (Coming Soon)
  7. Incorporating Existing Libraries (Coming Soon)

Security and Code Signing in SQL CLR

Before we publish our newly created SQL CLR Stored Procedure, we need to take a moment to discuss security.  SQL Server is a highly-protected environment.  As Database Administrators, we strive to work based off of least-privilege principles to keep the environment’s data secure and trustworthy.  Introducing a completely new set of code, running inside of our environment, should make us all take particular caution.  Unfortunately, there is quite a lot of debate across the internet about this, in which one side is saying, “Don’t worry about nitpicking over signed vs. unsigned code.  Protecting the front door is your real concern.”  While, yes, the front door (logins, roles, so forth) is often left vulnerable, shouldn’t we protect the  back door, especially when it is a NEW back door that we are opening willfully?

So, what is the risk?

The risk is that while signed code is guaranteed to match the code that was originally compiled, unsigned code could be manipulated to inject malicious commands that can be executed with very high privileges, without the DBA being aware at all.  This is another subject that could be spoken about for pages and pages worth of text, but suffice it to say, that I believe it is worth the 60 seconds (literally) that it takes to sign your code.

If it is so simple, why is there a debate?

Because, there are complications that can arise.  For one, if you are going to include another library with your code that was not signed, then you cannot sign your code.  Signed code requires that all dependencies are also signed.  This may be insurmountable.  Also, there may be a precedence set within your environment that is hard to overcome.  If downstream developers are not on board, and you need to use their libraries in your code, then you will either have to recompile their code as signed code, or convince them to move toward a signed assembly mindset.

So, how do I sign my code?

Signing code involves asymmetrically encrypting a hash (like a CRC) of the compiled code within the resultant assembly.  This enables the calling process to verify that the code has remained unchanged since the developer compiled it.  Since we are dealing with encryption, you will either need an existing signing certificate, issued by a CA (like Verisign) or do what is known as “Self-Signing”.  I am going to walk through Self-Signing our code, since it is free.

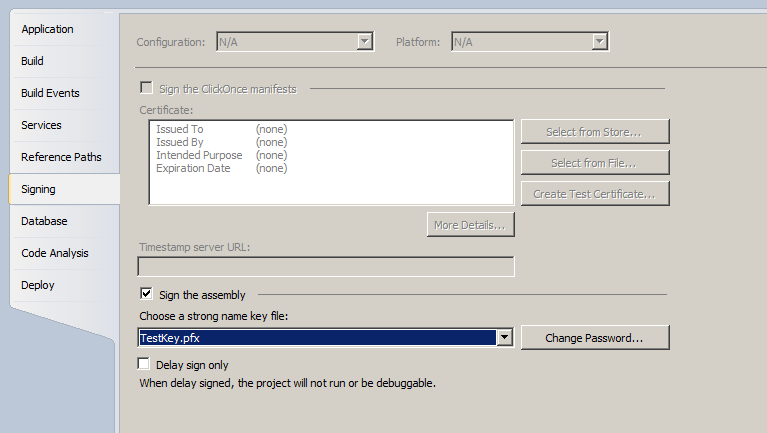
From within Visual Studio, in the Solution Explorer pane, right-click on the project and select “Properties”.  Then select the “Signing” tab to the left.  You will see a screen similar to this:

Signing Code

I click “Sign the assembly” and then I need to choose the “Strong Name Key File” I will use to sign the code. If I did not have an existing certificate, I could select “New..” from the drop-down:

New Strong Name Key File


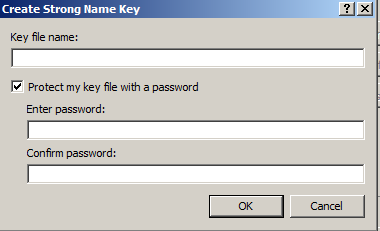
All I have to do in the “Create Strong Name Key” dialog box is define a name for my new key file and setup a good strong password.  Once I click “OK” in this dialog box and then save the project, my code will automatically be signed at compile time (as long as I do not have any unsigned references in my code).

Create Strong Name Key


What if I cannot sign my code?

If you cannot sign your code, you are going to have to tell SQL Server that you want it to trust “unsafe” assemblies.  You can do this through the ALTER ASSEMBLY command.

Now that we have made our decision about signing our code and taken the necessary steps, we are ready to deploy and test our new SQL CLR Stored Procedure.


This post is part of a series of blog posts entitled SQL CLR: An Introduction, the other posts are as follows:

  1. The Origination and Uses of SQL CLR
  2. Infrastructure Requirements and Configuration
  3. Writing a Simple CLR Stored Procedure
  4. Security and Signing
  5. Deployment and Usage
  6. Table-Valued Functions and Other SQL CLR (Coming Soon)
  7. Incorporating Existing Libraries (Coming Soon)

Writing a Simple CLR Stored Procedure

Now that we have a basic understanding of SQL CLR and have an environment configured to support the code we want to write, we can move on to writing our first SQL CLR stored procedure.  I am going to start out with a very simple piece of code, but one that solves a common problem in SQL Server: Matching Regular Expressions.

As I noted in a previous blog post, SQL Server does not have good native support for Regular Expressions, but when you are trying to sanitize data, Regular Expressions can save you a ton of processing time, development time, and effort.  So, let’s fill this need right now, by using SQL CLR.

Open the “Visual C# SQL CLR Database” Project that we created earlier and add a “Stored Procedure” class to the project, if you did not already do so.  I am going to call the file that will contain my class, “RegExTestMatch.cs”.  When you open this class for editing, you will see code that looks similar to the following:

using System;
using System.Data;
using System.Data.SqlClient;
using System.Data.SqlTypes;
using Microsoft.SqlServer.Server;
 
public partial class StoredProcedures
{
    [Microsoft.SqlServer.Server.SqlProcedure]
    public static void RegExTestMatch()
    {
        // Put your code here
    }
};

Now, without delving too deeply into programming, I need to bring up just a few points of information, for those not familiar with high-level programming languages (HLPLs).

Libraries

To make programming languages easier to use and to encourage proper code reuse, most HLPLs incorporate some form of libraries.  These are collections of classes, methods, and properties that can be used in other projects and classes.  Programmers can also create their own libraries and include them in future projects or make them available to other developers, or even the general public.  In C#, if a library is to be used within a particular set of code, that usage must first be communicated to the compiler, by way of the “using” statements at the top of the code listing.  You will notice, the code that was auto-generated when we added our class to our project already had five “using” statements, meaning that our code is already able to utilize the objects defined inside those five libraries.

Return Types

A method is similar to a procedure within SQL Server.  A method is generally a part of a class (not always) and defines some action that can be taken from within the specific class.  In the code that was generated for us, our method is named “RegExTestMatch”.  The word that directly preceeds that name, is called the return type.  This defines the data type that any calling process should expect to return from this method. By default, this method’s return type is “void” meaning that nothing will return from this method.  We can change this to suit our needs.

Object-Oriented Programming

For the sake of brevity, I will state that Object-Oriented Programming (OOP) is a style of programming that focuses on objects, which are usually classes (but certainly not always).  A class is defined by a programmer and then can be reused many times either within the same project or in other projects that reference the library containing this object.  For the purpose of this demonstration, the key point to understand is that we can create discrete instances of a specific class and that instance is what we use to perform whatever tasks we need.  This entire subject would require a lot more discussion to flesh out completely.

To Solve Our Problem

Now that we have a basic understanding of a few points within our managed language, we can address the problem at hand.  We are trying to create a CLR stored procedure that will accept a Regular Expression Pattern and a String to test for matching against said pattern.  We will then want to respond to the calling process with either a true or a false.

We will need to first be able to use Regular Expressions within our code, so we need to include a reference to the Regular Expressions library found within .NET, so let’s add that “using” statement:

using System;
using System.Data;
using System.Data.SqlClient;
using System.Data.SqlTypes;
using Microsoft.SqlServer.Server;
using System.Text.RegularExpressions;
 
public partial class StoredProcedures
{
    [Microsoft.SqlServer.Server.SqlProcedure]
    public static void RegExTestMatch()
    {
        // Put your code here
    }
};

Next, we need to decide what we are going to pass to the method and what we will return to the calling process.  There are many different ways that we could handle this, but to keep things simple, I am going to pass in two strings, a pattern and a test string, and then return an int, which I will either set to “1” to indicate that the test string did indeed match the pattern, or a “0” to indicate that it did not match:

using System;
using System.Data;
using System.Data.SqlClient;
using System.Data.SqlTypes;
using Microsoft.SqlServer.Server;
using System.Text.RegularExpressions;
 
public partial class StoredProcedures
{
    [Microsoft.SqlServer.Server.SqlProcedure]
    public static int RegExTestMatch(SqlString regExPattern, SqlString testString)
    {
        // Put your code here
    }
};

After we have our method setup, we need to instantiate an instance of the Regex class (which is the class within the “System.Text.RegularExpressions” library we will be using). During our instantiation, we can go ahead and pass in the pattern we want to match, but we will have to first cast the pattern to the correct datatype, “string”. That code looks like this:

Regex patternTester = new Regex((string)regExPattern);

The last part is to use our newly instantiated variable, which we named “patternTester”, to perform the test against our Test String. Once again, we must cast the variable to the correct datatype. Putting all of this together results in our final code, which looks like:

using System;
using System.Data;
using System.Data.SqlClient;
using System.Data.SqlTypes;
using Microsoft.SqlServer.Server;
using System.Text.RegularExpressions;
 
public partial class StoredProcedures
{
    [Microsoft.SqlServer.Server.SqlProcedure]
    public static int RegExTestMatch(SqlString regExPattern, SqlString testString)
    {
        Regex patternTester = new Regex((string)regExPattern);
        if (patternTester.IsMatch((string)testString))
            return 1;
        else
            return 0;
    }
};

Now, we will need to have a brief look at security before we move on to deploying and using this code.


This post is part of a series of blog posts entitled SQL CLR: An Introduction, the other posts are as follows:

  1. The Origination and Uses of SQL CLR
  2. Infrastructure Requirements and Configuration
  3. Writing a Simple CLR Stored Procedure
  4. Security and Signing
  5. Deployment and Usage
  6. Table-Valued Functions and Other SQL CLR (Coming Soon)
  7. Incorporating Existing Libraries (Coming Soon)

Infrastructure Requirements and Configuration for SQL CLR

To create and execute SQL CLR procedures (as well as other objects), there are several prerequisites that must first be met.  We are going to need:

  • Visual Studio (I’ll be using Visual Studio 2010 Ultimate)
  • A SQL Server Instance (I’ll be using SQL Server 2008 R2)
  • The .NET framework (For SQL Server 2008 R2, I’ll be using .NET 3.5)

These three components give us an application in which we can write and compile code, a database engine to host the code we will write, and the CLR we need to execute the code.

Configuration

The configuration steps for each component are simple, but I want to review them quickly here.  You may need to take particular consideration to setting up Visual Studio with your environment’s source control, but I will not be covering that in this series.  Each shop implements their source control a little differently and it would be best to stay consistent with the rest of your development endeavors.

SQL Server

For basic SQL CLR procedures, the only configuration needed on SQL Server is to enable CLR. I have included the script from MSDN here, for quick reference:

sp_configure 'show advanced options', 1;
GO
RECONFIGURE;
GO
sp_configure 'clr enabled', 1;
GO
RECONFIGURE;
GO

.NET Framework

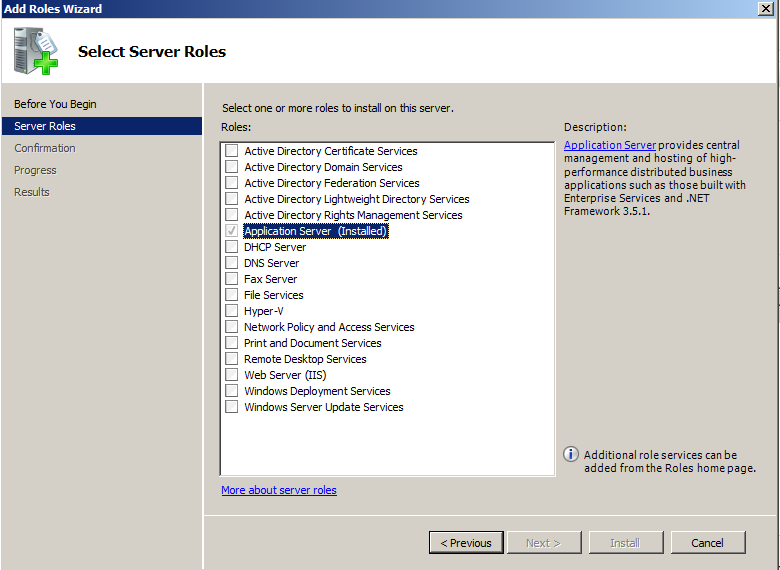
To enable the .NET Framework on the SQL Server, you will need to install the .NET 3.5 Framework (available from Microsoft).  If you are on Windows 2008 or Windows 2008 R2, you will have to Enable the Application Server Role first.  To enable the Application Server Role, you simply open “Server Manager”, right-click on “Roles” and select “Add Roles”.  Then select “Application Server” from the “Server Roles” list in the “Add Roles Wizard” dialog box, and click through the rest of the wizard to complete installation:

Add Application Server Role

Visual Studio

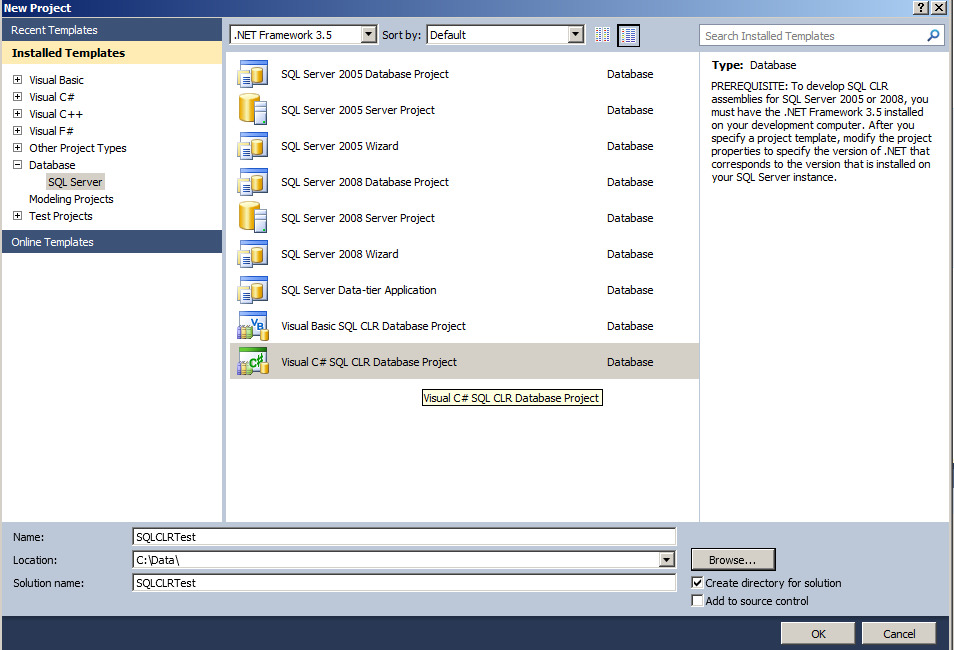
Lastly, we need to configure Visual Studio.  After we have Visual Studio installed, we can open it up and Create a New Project.  In the “New Project” Dialog box, select “Database” and then “SQL Server” from the Left pane, called “Installed Templates”.  In the center pane, select “Visual C# SQL CLR Database Project”.  I suggest C# just because it is the language I prefer and also the language I will be writing all future examples in, but you can also choose Visual Basic, if that suits you better.  At the top of the dialog, change the .NET Framework to 3.5 (this can be changed later, if needed), give the project a name, and click “OK” to create your project:

Visual Studio 2010 - New SQL CLR Project


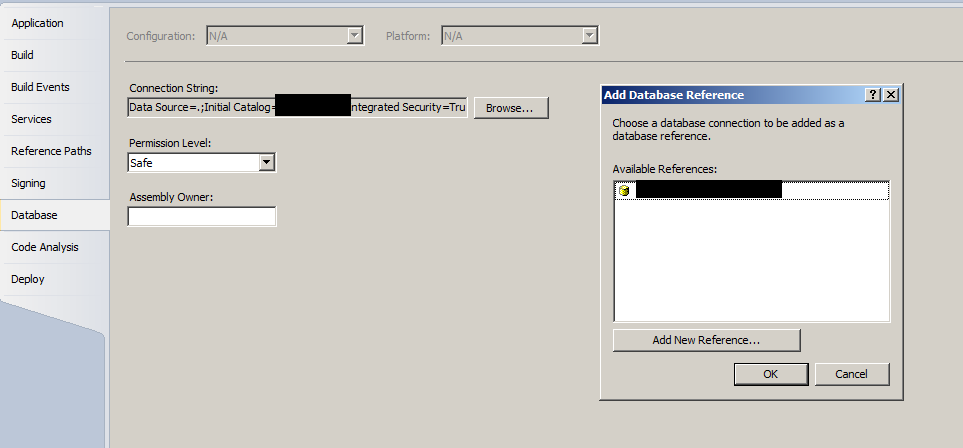
Now that we have an open project, we need to setup our connection to the database we will be using.  In the Solution Explorer pane of Visual Studio, right-click on the project you created, and select “Properties”. Find the “Database” tab, click on it, and then click the “Browse…” button next to the “Connection String” field.  A small dialog will come up, allowing you to chose an existing “Database Reference” or add a new one, if needed.  Select the appropriate database reference, and close out of this dialog:

Add Database Reference To Project


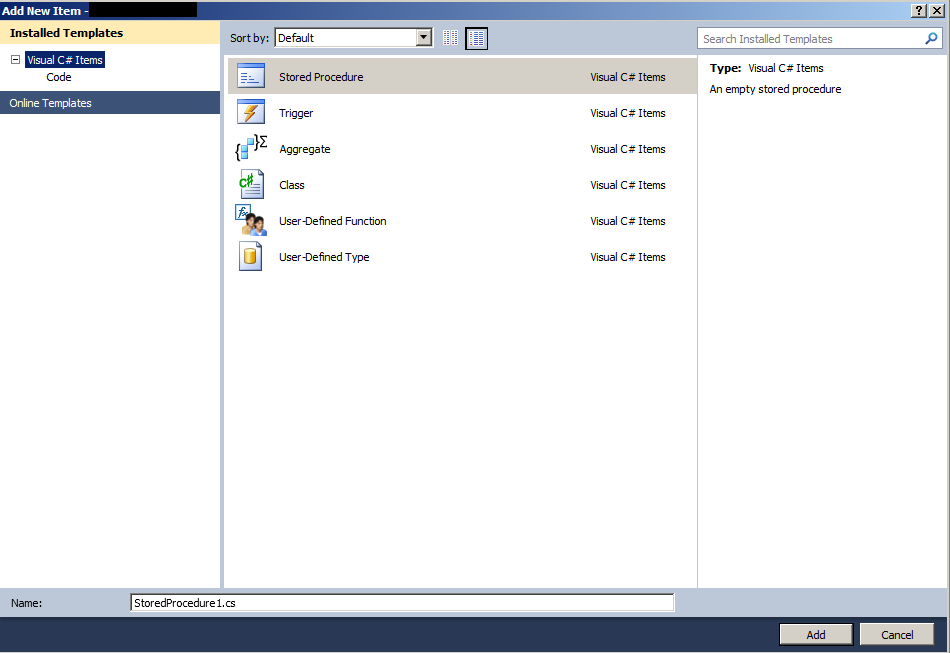
Lastly, we need to add a class that will contain the object(s) that we will be creating.  For example, we can create a “Stored Procedure” class by right-clicking on the Project in the Solution Explorer, and then select “Add”, and then “New Item…”.  This brings up the “Add New Item” dialog box, where we can select “Stored Procedure”.  Select that item, give it a name, and click the “Add” button:

Add Item To Project

Now we have an environment that is ready to start creating SQL CLR objects.


This post is part of a series of blog posts entitled SQL CLR: An Introduction, the other posts are as follows:

  1. The Origination and Uses of SQL CLR
  2. Infrastructure Requirements and Configuration
  3. Writing a Simple CLR Stored Procedure
  4. Security and Signing
  5. Deployment and Usage
  6. Table-Valued Functions and Other SQL CLR (Coming Soon)
  7. Incorporating Existing Libraries (Coming Soon)

The Origination and Uses of SQL CLR

Executive Summary

SQL CLR is a feature which allows database developers to create powerful code that can be executed from within SQL statements, utilizing familiar programming languages.

More Detail

SQL CLR is a feature, added in SQL Server 2005, that allows a database developer to host .NET managed code inside of a SQL Server database instance.  The hosted code can then be used within SQL DML statements to execute procedures/methods that were written in a .NET language.  To understand what is going on here, a brief understanding of .NET, CLR, CIL, and CLI is useful.

Starting in the early 2000s, Microsoft released a set of languages under a common framework, called .NET (Visual Basic .NET, C# .NET, and J# .NET).  The intent was to be able to bring a common set of features together from the different leading high-level programming languages at the time (Visual Basic, C/C++, and Java).  Microsoft published their own versions of each of these languages (Microsoft already had versions of all of these languages in the market), some being changed more greatly than others.

They were all published under one framework so that features available to one language would be available to all, although with different implementations.  Each of these languages would then compile down to a common code type, known as Common Intermediate Language (CIL).  This is not to be confused with the Common Language Infrastructure (CLI) which is a standard, developed by Microsoft, in conjunction with the .NET endeavor.  The CLI is the standard, .NET/CIL/CLR is just the way that Microsoft implemented this standard.

This Intermediate Language would then be converted by the Common Language Runtime (CLR) into machine code, which is specific to a particular processor family. Having this relationship between the CIL and the CLR is what makes .NET languages Interoperable and Portable.  The languages can be said to be Interoperable in that any language that compiles down to CIL can be linked with other similarly compiled code.  When I say Portable, I mean that, theoretically, a CLR-type interpreter (virtual machine) could be created for basically any platform you wish, and that new interpreter would be able to convert that CIL into machine code that would run on that platform.

This is where SQL CLR comes back into the picture.  The SQL Common Language Runtime hosts a distinct engine within SQL Server that runs the CIL that the database developer has created.  This enables programmers to work in the managed languages, with which they are already familiar.  They can take advantage of many of the features that are only available to managed and compiled code.  It is important to remember, however, that there is overhead in running through the CLR and poorly written or implemented methods can actually cause huge performance problems.  Like anything in database development, you have to learn how to use the tools effectively.  There are no magic bullets.


This post is part of a series of blog posts entitled SQL CLR: An Introduction, the other posts are as follows:

  1. The Origination and Uses of SQL CLR
  2. Infrastructure Requirements and Configuration
  3. Writing a Simple CLR Stored Procedure
  4. Security and Signing
  5. Deployment and Usage
  6. Table-Valued Functions and Other SQL CLR (Coming Soon)
  7. Incorporating Existing Libraries (Coming Soon)

SQL CLR: An Introduction

Microsoft SQL Server has a ton of features and tools built into the product that we use every day. But sometimes we need to be able to step outside of the base feature-set and jump into traditional programming to accomplish tasks that are either harder or impossible without doing so. In SQL Server 2005, Microsoft introduced SQL CLR to enable this sort of extensiblity. I have used SQL CLR to accomplish several different types of tasks and I have found that there are a lot of different nuances to consider when using this technology. I am going to attempt to distill these points into a short series of blog posts that will outline the basics of SQL CLR. The points I am hoping to cover are as follows:

  1. The Origination and Uses of SQL CLR
  2. Infrastructure Requirements and Configuration
  3. Writing a Simple CLR Stored Procedure
  4. Security and Signing
  5. Deployment and Usage
  6. Table-Valued Functions and Other SQL CLR (Coming Soon)
  7. Incorporating Existing Libraries (Coming Soon)

I will update this post with links to the other blog posts as I write them.  I hope that this short series will prove useful to those trying to wade through this technology.

My Red-Gate Hyperbac + DBCC CheckDB Script

Several people have asked me to post my script for automatically cycling through each database in an instance, restoring a virtual hyperbac database, performing consistency checks, and then e-mailing out the results, in reference to my previous post.

I am sorry it took me so long to get this put together, but pulling it out of my environment was the tough part.  I have a lot of infrastructure built up around this, so I had to extract the parts and try to cull it into one consistent script.  I have not tested this script very thoroughly, so please use with caution.  Make sure it works in your environment.  Keep in mind that you must have hyperbac already installed and setup to make proper user of this script.

Thank you for your patience:

SET NOCOUNT ON;
 
-- Constants
DECLARE @BACKUP_DAYS_THRESHOLD				INT = 8,
		@NEW_BACKUP_FILE_LOCATION			VARCHAR(256) = 'C:\Temp\BackupFileCopies\',
		@DATAFILE_RESTORATION_LOCATION		VARCHAR(256) = 'C:\Temp\DataFileRestores\',
		@DB_MAIL_PROFILENAME				SYSNAME = 'Database Administrators', 
		@EMAIL_RECIPIENTS					VARCHAR(1000) = 'yourEmail@yourDomain.com'
 
-- Retrieve List of Last Full Backups and their Backup Files
IF OBJECT_ID('TempDB..#lastBackupsTaken') IS NOT NULL
	DROP TABLE [#lastBackupsTaken]
 
CREATE TABLE [#lastBackupsTaken]
(
[serverName]		VARCHAR(256),
[databaseName]		VARCHAR(256),
[physicalFileSpec]	VARCHAR(256),
[backupFinishDate]	DATETIME
)
 
INSERT INTO
	[#lastBackupsTaken]
	(
	[serverName],
	[databaseName],
	[physicalFileSpec],
	[backupFinishDate]
	)
SELECT
	@@SERVERNAME,
	[BackupSets].[database_name],
	[MediaFamily].[physical_device_name],
	[BackupSets].[backup_finish_date]
FROM
	[msdb].[dbo].[backupset] AS BackupSets
 
		INNER JOIN (
					SELECT
						[database_name],
						MAX([backup_start_date]) AS MaxBackup_Start_Date
					FROM
						[msdb].[dbo].[backupset]
					WHERE
							[type] = 'D'
						AND	[backup_finish_date] IS NOT NULL
					GROUP BY
						[database_name]
					) AS Constrained ON
				[BackupSets].[database_name] = [Constrained].[database_name]
			AND	[BackupSets].[backup_start_date] = [Constrained].[MaxBackup_Start_Date]
			AND	[BackupSets].[type] = 'D'
 
		INNER JOIN [msdb].[dbo].[backupmediafamily] AS MediaFamily ON
			[BackupSets].[media_set_id] = [MediaFamily].[media_set_id]
 
-- Retrieve List of the FileGroups in the Databases as of the Last Full Backups
IF OBJECT_ID('TempDB..#logicalFilesForlastBackupsTaken') IS NOT NULL
	DROP TABLE [#logicalFilesForlastBackupsTaken]
 
CREATE TABLE [#logicalFilesForlastBackupsTaken]
(
[serverName]	VARCHAR(256),
[databaseName]	VARCHAR(256),
[logicalName]	VARCHAR(256)
)
 
INSERT INTO
	[#logicalFilesForlastBackupsTaken]
SELECT
	@@SERVERNAME,
	[BackupSets].[database_name],
	[LogicalFiles].[logical_name]
FROM
	[msdb].[dbo].[backupset] AS BackupSets
 
		INNER JOIN (
					SELECT
						[database_name],
						MAX([backup_start_date]) AS MaxBackup_Start_Date
					FROM
						[msdb].[dbo].[backupset]
					WHERE
							[type] = 'D'
						AND	[backup_finish_date] IS NOT NULL
					GROUP BY
						[database_name]
					) AS Constrained ON
				[BackupSets].[database_name] = [Constrained].[database_name]
			AND	[BackupSets].[backup_start_date] = [Constrained].[MaxBackup_Start_Date]
 
		INNER JOIN [msdb].[dbo].[backupfile] AS LogicalFiles ON
				[BackupSets].[backup_set_id] = [LogicalFiles].[backup_set_id]
			AND	[LogicalFiles].[is_present] = 1
 
-- Create a list of all databases we are going to restore and Consistency Check (DBCC CHECKDB)
IF OBJECT_ID('TempDB..#databasesToCheck') IS NOT NULL
	DROP TABLE [#databasesToCheck]
 
CREATE TABLE [#databasesToCheck]
(
[databaseName]		VARCHAR(256),
[executionOrder]	INT IDENTITY(1,1)
)
 
INSERT INTO
	[#databasesToCheck]
	(
	[databaseName]
	)
SELECT
	[databaseName]
FROM
	[#lastBackupsTaken]
WHERE
	[databaseName] NOT IN (
							'master',
							'tempdb'
							)
GROUP BY
	[databaseName]
 
-- For each database in the list, copy the backup files, run a Red-Gate Hyperbac Virtual Restore, Run Consistency Check, Record the results, and then drop the database
DECLARE @currentDBIdentifier			INT,
		@maxDBIdentifier				INT,
		@currentDBName					VARCHAR(256),
		@lastBackupTime					DATETIME,
		@statusMessage					VARCHAR(MAX) = '',
		@statusCode						INT = 0,
		@errorMessage					VARCHAR(MAX) = '',
		@messageSubject					VARCHAR(256),
		@sql							VARCHAR(MAX) = '',
		@backupCopyResults				VARCHAR(MAX) = '',
		@currentBackupFileIdentifier	INT,
		@maxBackupFileIdentifier		INT,
		@commandLine					VARCHAR(2000),
		@databaseWasRestored			BIT = 0
 
IF OBJECT_ID('TempDB..#backupFilesToHandle') IS NOT NULL
	DROP TABLE [#backupFilesToHandle]
 
CREATE TABLE [#backupFilesToHandle]
(
[oldFileSpec]		VARCHAR(256),
[newFileSpec]		VARCHAR(256),
[executionOrder]	INT IDENTITY(1,1)
)
 
IF OBJECT_ID('TempDB..#commandLineResults') IS NOT NULL
	DROP TABLE [#commandLineResults]
 
CREATE TABLE [#commandLineResults]
(
[outputLine]		NVARCHAR(255)
)
 
IF OBJECT_ID('TempDB..#checkDBResults') IS NOT NULL
	DROP TABLE [#checkDBResults]
 
CREATE TABLE [#checkDBResults]
(
[ServerName] [varchar](100) NULL,
[DatabaseName] [varchar](256) NULL,
[Error] [varchar](256) NULL,
[Level] [varchar](256) NULL,
[State] [varchar](256) NULL,
[MessageText] [varchar](7000) NULL,
[RepairLevel] [varchar](256) NULL,
[Status] [varchar](256) NULL,
[DbId] [varchar](256) NULL,
[Id] [varchar](256) NULL,
[IndId] [varchar](256) NULL,
[PartitionId] [varchar](256) NULL,
[AllocUnitId] [varchar](256) NULL,
[File] [varchar](256) NULL,
[Page] [varchar](256) NULL,
[Slot] [varchar](256) NULL,
[RefFile] [varchar](256) NULL,
[RefPage] [varchar](256) NULL,
[RefSlot] [varchar](256) NULL,
[Allocation] [varchar](256) NULL,
[insert_date] [datetime] NULL
)
 
-- Begin Database Loop
SELECT
	@currentDBIdentifier = MIN([executionOrder]),
	@maxDBIdentifier = MAX([executionOrder])
FROM
	[#databasesToCheck]
 
WHILE (@currentDBIdentifier < @maxDBIdentifier) 	BEGIN 		SELECT 			@currentDBName = [databaseName] 		FROM 			[#databasesToCheck] 		WHERE 			[executionOrder] = @currentDBIdentifier 		-- Let's make sure the last database backup isn't too old (in case some third-party script clears off old database backups) 		SELECT 			@lastBackupTime = MAX([backupFinishDate]) 		FROM 			[#lastBackupsTaken] 		WHERE 			[databaseName] = @currentDBName 		IF (DATEDIFF(DAY,@lastBackupTime,GETDATE()) > @BACKUP_DAYS_THRESHOLD)
			BEGIN
				-- The oldest backup for this database was taken too long ago
				SET @statusMessage =  @statusMessage + 'DBCC FOR ' + @currentDBName + ' was not properly performed (Last Backup Too Old)
'
				SET @statusCode = @statusCode + 1
			END
		ELSE
			BEGIN
				-- Prepare the Backup Files
				TRUNCATE TABLE [#backupFilesToHandle]
 
				INSERT INTO
					[#backupFilesToHandle]
					(
					[oldFileSpec],
					[newFileSpec]
					)
				SELECT
					[physicalFileSpec],
					@NEW_BACKUP_FILE_LOCATION + SUBSTRING([physicalFileSpec],((LEN([physicalFileSpec]))-(CHARINDEX('\',REVERSE([physicalFileSpec])))+2),(CHARINDEX('\',REVERSE([physicalFileSpec])))-1)
				FROM
					[#lastBackupsTaken]
				WHERE
					[databaseName] = @currentDBName
 
				-- Start the restore script and copy the backup files
				SET @sql = 'RESTORE DATABASE [' + @currentDBName + '_Virtual] FROM
							'
 
				-- Begin Backup File Loop
				SELECT
					@currentBackupFileIdentifier = MIN([executionOrder]),
					@maxBackupFileIdentifier = MAX([executionOrder])
				FROM
					[#backupFilesToHandle]
 
				WHILE (@currentBackupFileIdentifier <= @maxBackupFileIdentifier)
					BEGIN
 
						-- Create Command Line syntax for file copy
						SELECT
							@commandLine = 'copy "' + [oldFileSpec] + '" "' + [newFileSpec] + '" /Y'
						FROM
							[#backupFilesToHandle]
						WHERE
							[executionOrder] = @currentBackupFileIdentifier
 
						-- Truncate the Command Line Results Table
						TRUNCATE TABLE [#commandLineResults]
 
						INSERT INTO
							[#commandLineResults]
						EXEC
							[master].[dbo].[xp_cmdshell] @commandLine
 
						-- Record Copy Results
						SET @backupCopyResults = @backupCopyResults + '
For command issued=' + @commandLine + '
'
 
						SELECT
							@bakCopyResults = @bakCopyResults + '
' + ISNULL([outputLine],'NULL')
						FROM
							[#commandLineResults]
 
						-- Add this file to the restore script
						SELECT
							@sql = @sql + 'DISK=N''' + [newFileSpec] + ''','
						FROM
							[#backupFilesToHandle]
						WHERE
							[executionOrder] = @currentBackupFileIdentifier
 
						SET @currentBackupFileIdentifier = @currentBackupFileIdentifier + 1
					END -- Loop to next Backup File
 
				-- Now that all backup files have been moved and we have added their new locations to the restore script,
					-- we now need to remove the trailing comma
				SET @sql = LEFT(@sql,LEN(@sql)-1) + '
				WITH 
				'
 
				-- Now we need to add the database files to the restore script
				SELECT
					@sql = @sql + 'MOVE N''' + [logicalName] + ''' TO N''' + @DATAFILE_RESTORATION_LOCATION + LEFT(@currentDBName,35) + '_Virtual_' + LEFT([logicalName],35) +'.vmdf'','
				FROM
					[#logicalFilesForlastBackupsTaken]
				WHERE
					[databaseName] = @currentDBName
 
				-- Remove the trailing comma
				SET @sql = @sql + 'NORECOVERY, STATS=1, REPLACE
				'
				-- Now, we have the files moved and the restoration script created.  Next thing to do is to restore the database (using hyperbac)
				SET @databaseWasRestored = 0
 
				BEGIN TRY
 
					-- Restore the database
					EXEC(@sql)
 
					-- Recover the database
					SET @sql = 'RESTORE DATABASE [' + @currentDBName + '_Virtual] WITH RECOVERY, RESTRICTED_USER'
					EXEC(@sql)
 
					-- Put the virtual DB in Simple Recovery Model, since we do not need anything higher than that for the DBCC CHECKDB
					SET @sql = 'ALTER DATABASE [' + @currentDBName + '_Virtual] SET RECOVERY SIMPLE WITH NO_WAIT'
					EXEC(@sql)
 
					SET @databaseWasRestored = 1
 
				END TRY
 
				BEGIN CATCH
 
						SET @errorMessage = @errorMessage + @currentDBName + '
' + @backupCopyResults + '
 
' + 'Error Number: ' + CONVERT(VARCHAR,ERROR_NUMBER()) + ', Error Message: ' + ERROR_MESSAGE() + '
'
						SET	@statusMessage = @statusMessage + 'DBCC FOR ' + @currentDBName + ' was not restored properly (error message below). 
'
						SET @statusCode = @statusCode + 1	
 
				END CATCH
 
				-- Only continue if the database was properly restored
				IF (@databaseWasRestored = 1)
					BEGIN
 
						-- Run DBCC CHECKDB and Save the results to a table
						INSERT INTO
							[#checkDBResults]
							(
							[Error],
							[Level],
							[State],
							[MessageText],
							[RepairLevel],
							[Status],
							[DbId],
							[Id],
							[IndId],
							[PartitionId],
							[AllocUnitId],
							[File],
							[Page],
							[Slot],
							[RefFile],
							[RefPage],
							[RefSlot],
							[Allocation]
							)
						EXEC('DBCC CHECKDB(''' + @currentDBName + '_Virtual'') WITH TABLERESULTS')
 
						-- Fill in missing information
						UPDATE
							[#checkDBResults]
						SET
							[ServerName] = @@SERVERNAME,
							[DatabaseName] = @currentDBName
						WHERE
							[ServerName] IS NULL
 
						-- Drop the restored database
						EXEC('DROP DATABASE ['+ @currentDBName + '_Virtual]')
 
						-- analyze all DBCC checkdb results, e-mail out when an error is encountered
						IF EXISTS (
									SELECT
										[ServerName]
									FROM
										[#checkDBResults]
									WHERE
											[ServerName] = @@SERVERNAME
										AND	[DatabaseName] = @currentDBName
										AND [MessageText] LIKE 'CHECKDB found 0 allocation errors and 0 consistency errors in database %'
									)
							BEGIN
								SET	@statusMessage = @statusMessage + 'DBCC FOR ' + @currentDBName + ' Passed.
'
							END	-- Condition: A passing entry for this DB in DBCC Results
						ELSE IF EXISTS (
										SELECT
											[ServerName]
										FROM
											[#checkDBResults]
										WHERE
												[ServerName] = @@SERVERNAME
											AND	[DatabaseName] = @currentDBName
										)
							BEGIN
								SET	@statusMessage = @statusMessage + 'DBCC FOR ' + @currentDBName + ' Failed! (Check the [#checkDBResults] table)
'
								SET @statusCode = @statusCode + 1
							END	-- Condition: No passing entry for this DB in DBCC Results
						ELSE
							BEGIN
								SET	@statusMessage = @statusMessage + 'DBCC FOR ' + @currentDBName + ' was not properly performed (Check Configuration)
'
								SET @statusCode = @statusCode + 1
							END	-- Condition: No entry whatsoever for this DB in DBCC Results
 
					END -- End of "Database was properly restored"
 
				SET @currentDBIdentifier = @currentDBIdentifier + 1
			END -- End of "Check if last backup is too old"
 
	END -- Loop to next Database
 
SET	@statusMessage = @statusMessage + '
DBCC CheckDB Process has completed for ' + @@SERVERNAME + ' at ' + CONVERT(VARCHAR,GETDATE(),120) + '
'
 
IF @statusCode = 0
	BEGIN
		SET @messageSubject = 'SUCCESS - DBCC CheckDB for ' + @@SERVERNAME
	END	-- Condition: There were no errors or failures in the consistency checking of this instance
ELSE
	BEGIN
		SET @messageSubject = 'FAILURE - DBCC CheckDB for ' + @@SERVERNAME
		SET @statusMessage = @statusMessage + @errorMessage
	END	-- Condition: At least one consistency check either failed or resulted in an error
 
EXEC [msdb].[dbo].[sp_send_dbmail]
	@profile_name = @DB_MAIL_PROFILENAME, 
	@recipients = @EMAIL_RECIPIENTS,
	@body = @statusMessage,
	@subject = @messageSubject,
	@body_format = 'HTML';

SQL Agent Job Frequency Intervals in Plain English

A DBA I was talking to was trying to create a simple process that finds each SQL Agent Job on a given instance, extracts the basic information regarding it, and compiles a list that can be presented to non-DBAs for information about what sort of “undiscovered” processes are running in a given environment.  He had gotten a lot of the information compiled, but was having a problem dissecting the Job Schedule “Frequency Interval” field.  Now, to anyone who is familiar with binary, this is a fairly straight-forward bit-flag usage of a higher-order data-type.  But, not all DBAs have this in their background, and I think many could benefit from seeing it spelled out.

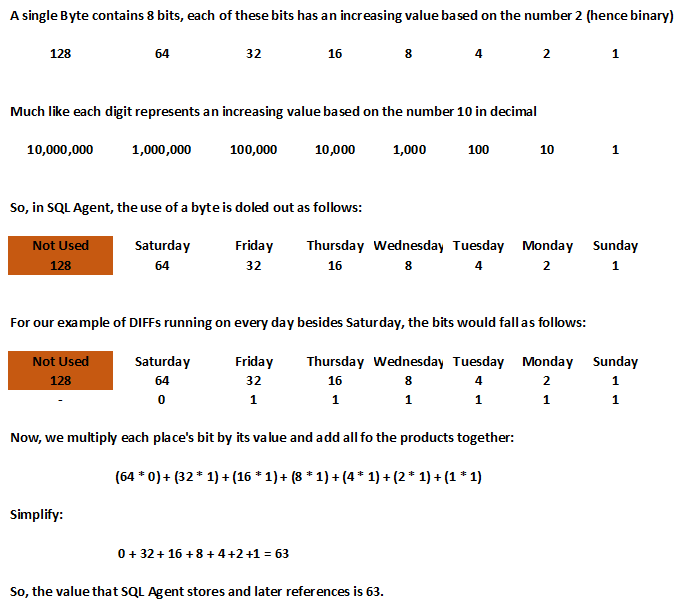
In the SQL Agent, you have the ability to have week-based job schedules, in which, you can specify particular days of the week.  For example, you may have a weekly job that performs your FULL backups, that only runs on Saturday, and then have your DIFFs run on Monday, Tuesday, Wednesday, Thursday, Friday, and Sunday.  Well, SQL Agent stores this sort of information in a single field as an integer.  This may seem awkward, but the logic behind it is very straight-forward.  Each of the lowest-order 7 bits represents a yes/no flag for a particular day of the week:

SQLAgentIntervalFrequenceBinaryExplaination
So, now that we have examined what this integer really means, the question naturally follows: “How do we represent this integer as a series of days?” I have written two different pieces of code to accomplish this. The first simply takes an integer at the beginning of the script and returns a simple string containing the days represented by that integer (this could easily be turned into a UDF or stored procedure). The second piece of code goes about things a little differently, but works well for the particular use case that we were originally discussing.

The first T-SQL:

SET NOCOUNT ON;
DECLARE @numberToTest   TINYINT = 119,
		@weekString     CHAR(21) = 'SunMonTueWedThuFriSat',
		@resultString	VARCHAR(35) = ''
 
IF OBJECT_ID('TempDB..#daysOfWeek') IS NOT NULL
	DROP TABLE #daysOfWeek
 
CREATE TABLE #daysOfWeek
(
[dayNumber]   TINYINT,
[dayCode]     TINYINT
)
 
INSERT INTO
	[#daysOfWeek]
	(
	[dayNumber],
	[dayCode]
	)
VALUES
	(1,1),
	(2,2),
	(3,4),
	(4,8),
	(5,16),
	(6,32),
	(7,64)
 
SELECT
	@resultString = @resultString + CASE
						WHEN (@numberToTest &amp; [dayCode]) = [dayCode] THEN
							SUBSTRING(@weekString,(([dayNumber] - 1) * 3 + 1),3) + ', '
						ELSE ''
					END
FROM
	[#daysOfWeek]                                    
 
-- Strip off the last comma
IF (LEN(@resultString) &gt; 1)
	SET @resultString = LEFT(@resultString,LEN(@resultString) - 1)
 
SELECT
	@resultString

And, the second T-SQL:

SET NOCOUNT ON;
 
IF OBJECT_ID('TempDB..#daysOfWeek') IS NOT NULL
       DROP TABLE #daysOfWeek
 
CREATE TABLE #daysOfWeek
(
[dayNumber]   TINYINT,
[dayCode]     TINYINT,
[dayName]		VARCHAR(11)
)
 
INSERT INTO
       [#daysOfWeek]
       (
       [dayNumber],
       [dayCode],
	   [dayName]
       )
VALUES
       (1,1, 'Sunday '),
       (2,2, 'Monday '),
       (3,4, 'Tuesday '),
       (4,8, 'Wednesday '),
       (5,16, 'Thursday '),
       (6,32, 'Friday '),
       (7,64, 'Saturday ')
 
;WITH BaseData AS (
			SELECT
				[SYSJOB].[job_id],
				[SYSJOB].[name],
				[SYSSCH].[freq_interval],
				[DOW].[dayName]
			FROM
				[msdb].[dbo].[sysjobs] AS SYSJOB
 
					INNER JOIN [msdb].[dbo].[sysjobschedules] AS SYSJOBSCH ON
						[SYSJOB].[job_id] = [SYSJOBSCH].[job_id]
 
					INNER JOIN [msdb].[dbo].[sysschedules] AS SYSSCH ON
						[SYSJOBSCH].[schedule_id] = [SYSSCH].[schedule_id]
 
						LEFT OUTER JOIN [#daysOfWeek] AS DOW ON
							([SYSSCH].[freq_interval] &amp; [DOW].[dayCode]) = [DOW].[dayCode]    
			)
SELECT
	[job_id],
	[name],
	REPLACE(REPLACE([DayNames],'',''),'','') AS DayNames
FROM
	(
	SELECT
		[job_id],
		[name],
		(
		SELECT
			[dayName]
		FROM
			[BaseData] 
		WHERE
			[job_id] = [Grouped].[job_id]
		FOR XML PATH ('')
		) AS DayNames
	FROM
		[BaseData] AS Grouped
	GROUP BY
		[job_id],
		[name]
	) AS ConcatenatedData